TL;DR
- I split the work: Tailwind CSS is compiled through the CLI inline build tool, while Prepros handles livereload, JS compilation, and watching CSS/JS/PHP files.
- Tailwind setup is as simple as
@import "tailwindcss"andnpx @tailwindcss/cli --watch— no Vite or Webpack required. - For me, this workflow is stable and straightforward for custom WordPress themes built around the Classic Editor.
- It is not ideal for Gutenberg-heavy projects unless blocks are kept as placeholders.
- WordPress theme header comments in
style.cssstay intact with the/*! ... */syntax.
Many developers jump straight into Vite, Webpack, or a starter kit when they start using Tailwind CSS. That approach is modern — but not always necessary.
Most of the WordPress projects I work on are custom PHP-based themes. The structure is simple. I do not need Hot Module Replacement or a complex development server. What I do need is fast CSS compilation, reliable file watching, and livereload so design iterations feel effortless.
My solution: Tailwind CSS CLI for building CSS, Prepros for everything else. I have used this combination across multiple projects, and it remains my go-to workflow to this day.
This is not a generic tutorial. It is a personal case study — covering setup steps, how each tool fits in, and the limitations you should consider before adopting it.
Workflow Overview
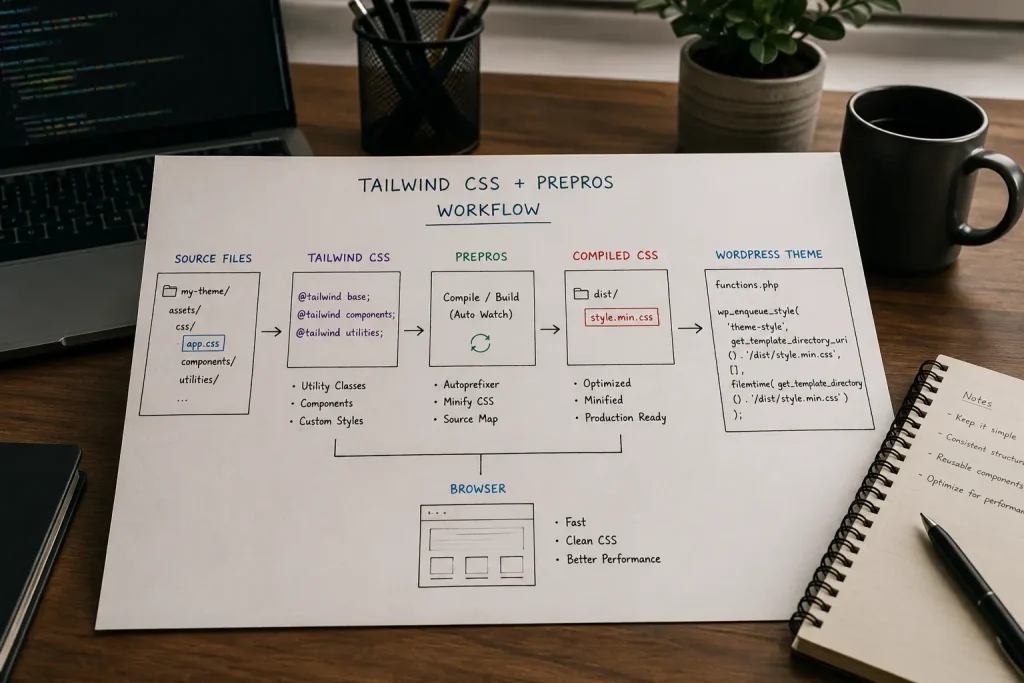
Before diving into the technical steps, it helps to understand who does what:
Tailwind CSS CLI
↓
Compile ./src/css/tailwind.css → ./style.css (--watch)

Prepros
↓
Browser livereload
↓
Compile JavaScript
↓
Watch CSS, JS, and PHP

WordPress
↓
style.css (theme header + compiled Tailwind CSS)
↓
wp_enqueue_style()
↓
Website
The Tailwind CLI is only responsible for generating utility classes into style.css. Prepros does not replace Tailwind — it handles live reload, JS bundling, and monitoring project file changes as a whole.
Setting Up Tailwind CSS with the Inline Build Tool
Here are the steps I run every time I start a new WordPress theme project.
Step 1 — Confirm Your Node Version
I use Node v20.11.1. Check what is installed on your machine:
node -vExample output on my Mac:
v20.11.1I stick with v20.11.1 for consistency across projects. If your version differs, make sure the Tailwind CLI runs without issues before moving on.
Step 2 — Install Tailwind CSS and the CLI
Run this command from your theme root:
npm install tailwindcss @tailwindcss/cliNo additional build tool configuration is needed. These two packages are enough for the inline build workflow I use.
Step 3 — Create the Source CSS File
I create the source CSS file at:
src/css/tailwind.cssThis file only contains Tailwind directives — it is not enqueued directly in WordPress.
Step 4 — Import Tailwind in the CSS File
The contents of src/css/tailwind.css:
@import "tailwindcss";That is it. No legacy @tailwind base/components/utilities directives. Tailwind v4 only needs this single import line.
Step 5 — Run Watch Mode
In your terminal, run:
npx @tailwindcss/cli -i ./src/css/tailwind.css -o ./style.css --watchThis command will:
- Read
./src/css/tailwind.cssas input - Write the compiled output to
./style.css - Keep running and re-compile whenever changes are detected
Leave this terminal open throughout your development session. Every time I add utility classes in a PHP file or template, the Tailwind CLI automatically updates style.css.
Step 6 — Preserve the WordPress Theme Header Comment
WordPress requires a header comment in style.css so the system can recognize the theme. When Tailwind overwrites the output file, regular comments (/* ... */) can get stripped out.
The fix: add ! at the start of the comment so it survives in the compiled output:
/*!
	Theme Name: Your theme name
	Theme URI: https://themeuri.com/
	Description: Description of theme
	Version: 1.0
	Author: Your name
	Author URI: https://yourname.com/
	Created Date: 07/07/2026
	License: GNU General Public License version 3.0
	License URI: http://www.gnu.org/licenses/gpl-3.0.html
	Tags: creative, agency
	Text Domain: text-domain
*/
I place this header in src/css/tailwind.css — above @import "tailwindcss". Every time the CLI re-compiles, the WordPress theme header stays intact in style.css.
Prepros Role in This Workflow
Prepros is not a replacement for the Tailwind CLI. In my setup, Prepros handles three things:
| Task | Description |
|---|---|
| Livereload | Browser refreshes automatically when files change — no manual reload needed |
| Compile JS | Bundling and minifying theme JavaScript files |
| Watch CSS, JS, PHP | Monitoring project file changes across the board |
My daily flow:
- Open the theme folder in my editor (VS Code).
- Start the Tailwind CLI watch in a terminal.
- Open Prepros and drag the theme folder into it.
- Start coding PHP templates, add utility classes, save files.
- Tailwind CLI updates
style.css→ Prepros detects the change → browser reloads automatically.
With this split, I do not need one build tool to handle everything. Tailwind focuses on CSS. Prepros focuses on the day-to-day development experience.
Folder Structure I Use
my-theme/

├── src/
│   └── css/
│       └── tailwind.css      ← source (WP header + @import)
│
├── assets/
│   └── js/
│       └── app.js            ← JS source, compiled by Prepros
│
├── template-parts/
├── inc/
├── functions.php
├── style.css                 ← Tailwind CLI output (do not edit manually)
├── package.json
└── prepros.config
Simple rules I follow:
- Edit →
src/css/tailwind.css, PHP files, source JS files - Do not edit manually →
style.css(this file is generated by the Tailwind CLI) - Enqueue in WordPress →
style.cssand JS compiled by Prepros
Advantages of This Workflow
- Fast setup — no Vite or Webpack configuration required.
- Clear separation of concerns — Tailwind for CSS, Prepros for livereload and JS.
- Easy to move between machines — just run `npm install` and start two processes (CLI + Prepros).
- Works well with the Classic Editor — utility classes go directly in PHP templates without extra abstraction layers.
- WordPress theme header stays safe — thanks to the
/*! */syntax in the source file. - Productive for PHP-heavy themes — ACF, Custom Post Types, WooCommerce, template parts.
Limitations of This Workflow
This workflow is not a one-size-fits-all solution. Here are the main drawbacks to consider:
1. Not ideal for Gutenberg-heavy projects
This workflow works best when WordPress does not rely on Gutenberg — in other words, Classic Editor / PHP template-based themes.
The reason: on Gutenberg projects, I typically create separate CSS files per component or block. A Tailwind CLI that compiles into a single style.css is not always flexible enough for that kind of architecture.
Exception: if Gutenberg blocks are kept as placeholders (minimal markup, styling still handled via utility classes in templates), this workflow can still work.
2. Two processes need to run at the same time
You need both the Tailwind CLI terminal and Prepros running simultaneously. It is not a single npm run dev command like a Vite setup.
3. No Hot Module Replacement
CSS/JS changes trigger a full page reload via livereload — not the near-instant HMR you get with Vite. For PHP themes, this rarely matters. For JS-heavy projects, it feels less optimal.
4. style.css as a single output file
All utility classes end up in one file. For large themes with many isolated components (such as block editor blocks), a multi-file CSS approach is easier to maintain.
Mistakes I Have Made
- Editing
style.cssdirectly — changes disappear when the Tailwind CLI re-compiles. Always editsrc/css/tailwind.cssor your PHP templates instead. - Forgetting to run watch mode — new utility classes never appear in the output. Keep the CLI terminal running.
- Using a regular
/* */theme header — WordPress fails to recognize the theme. Use/*! */instead. - Expecting Prepros to compile Tailwind — Prepros watches
style.css, but the Tailwind CLI is what generates its contents. - Using this workflow on complex Gutenberg projects — block CSS becomes hard to organize. Split files per component instead.
Frequently Asked Questions
Is Prepros still worth using in 2026?
In my experience, yes — especially for livereload and JS compilation on PHP-based WordPress theme projects. Prepros complements the Tailwind CLI; it does not replace it.
Do I need Vite?
Not always. If your project is a custom PHP theme without a modern JS framework, the Tailwind CLI + Prepros combination is enough.
Why not compile Tailwind through Prepros?
Tailwind v4 with @tailwindcss/cli is already lightweight and reliable as an inline build tool. I prefer an explicit separation of responsibilities over forcing one tool to do everything.
Does this workflow work with Gutenberg?
Only to a limited extent. It works if blocks are kept as placeholders. It does not work well when every block has its own CSS file and complex styling — in those cases, I use a multi-file CSS approach or a more modular build tool.
What about the Node version?
I use v20.11.1. Run node -v before installing. If you run into compatibility issues, try adjusting the Node version on your machine.
Conclusion
There is no single workflow that fits every project. Mine may not be the most modern — but it has proven stable, simple, and productive for custom WordPress themes built around the Classic Editor.
The Tailwind CSS CLI handles CSS compilation. Prepros handles livereload, JS, and file watching. WordPress simply enqueues the compiled style.css.
If your project starts moving toward Gutenberg blocks with per-component CSS, or modern JS frameworks like React or Vue, consider switching to a more modular build tool — Vite, for example.
As long as your project centers on PHP templates and utility-first styling, the Tailwind CSS CLI + Prepros combination remains the workflow I reach for most often.